Kubernetes Fundamentals: A Beginner's Guide
Final-year BSc IT student and DevOps Engineer with strong hands-on experience in AWS and cloud-native technologies. I focus on building, deploying, and automating reliable systems using modern DevOps practices.
I have practical experience working with Docker and Kubernetes for containerization and orchestration, Terraform and Ansible for infrastructure automation, and CI/CD pipelines using Jenkins, GitHub Actions, and AWS CodePipeline. I enjoy solving real-world problems related to deployment, scalability, and system reliability.
In the ever-evolving DevOps landscape, Kubernetes has emerged as the leading container orchestration tool, simplifying deployment, scaling, and management of containerized applications. This blog dives into Kubernetes fundamentals, architecture, and a hands-on setup guide to get you started.
What is Kubernetes?
Kubernetes, often abbreviated as K8s (8 letters between K and S), is a framework initially developed by Google as BORG. It later became open-source and evolved into Kubernetes. It's a robust tool used to manage containerized applications in a clustered environment. Key features include:
Auto-scaling
Auto-healing
High availability
Why Kubernetes?
Modern applications often use the Microservices architecture, where individual services (e.g., login, order processing) operate independently. Kubernetes ensures smooth operation by managing containers, enabling auto-scaling, and providing fault tolerance.
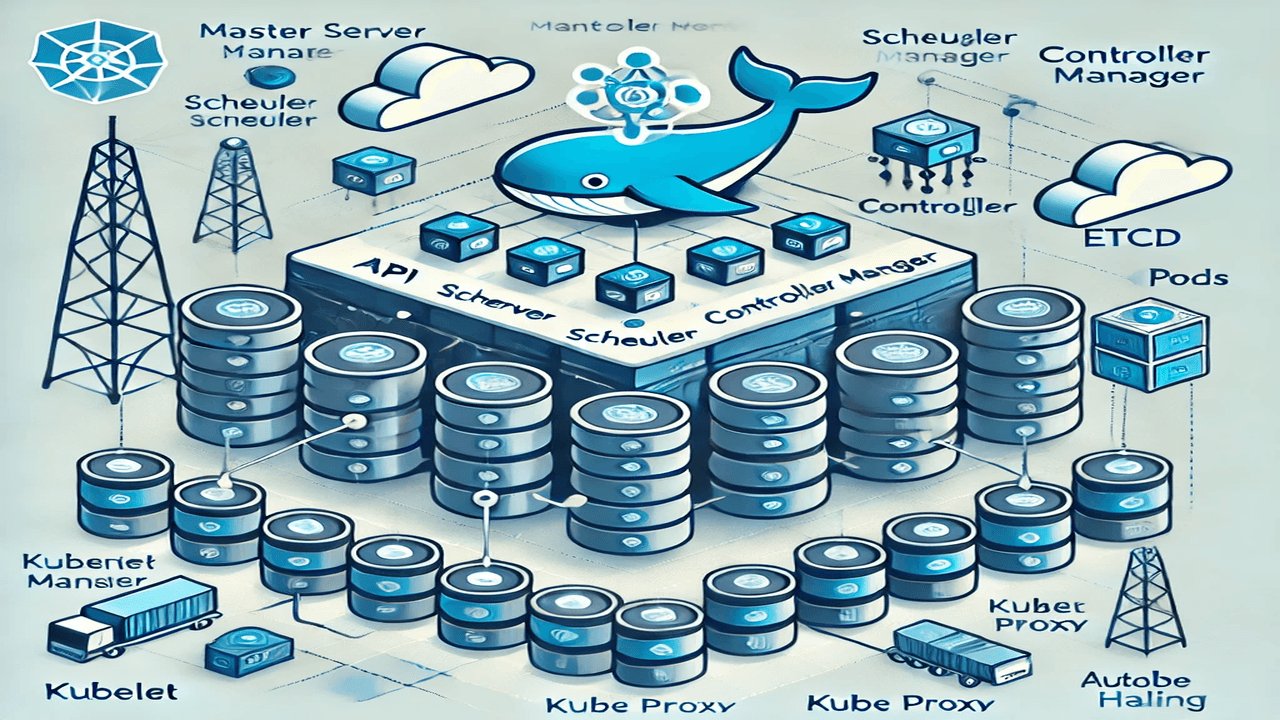
Kubernetes Architecture
A Kubernetes cluster comprises:
Master Node
The brain of the cluster responsible for managing worker nodes.Key components:
API Server: Central communication hub.
Scheduler: Assigns tasks to nodes.
Controller Manager: Manages cluster state and node health.
etcd: Stores cluster data as a key-value store.
CNI (Container Network Interface): Enables communication between master and worker nodes.
Kube Proxy: Manages communication between users and cluster applications.
Worker Nodes
The nodes where containerized applications run. Each worker node has:Kubelet: Ensures node health and communicates with the API server.
Pods: Smallest deployable units in Kubernetes, running one or more containers.
Diagram

Kubernetes Installation
Installation Options
Local
Minikube
Kops
KIND (Kubernetes in Docker): We'll use KIND for this guide.
Cloud
AWS EKS
Azure AKS
Google GKE
Hands-On: Kubernetes with KIND
Prerequisites
An EC2 instance (t2.medium recommended).
Docker installed.
Steps
1. Install Docker
Use the command:
sudo apt install docker.io
2. Install KIND
Download KIND for Linux:
[ $(uname -m) = x86_64 ] && curl -Lo ./kind https://kind.sigs.k8s.io/dl/v0.25.0/kind-linux-amd64
chmod +x ./kind
sudo mv ./kind /usr/local/bin/kind
3. Validate KIND Installation
Check the setup using:
kind --version
4. Install kubectl
Download kubectl for x86_64:
curl -LO "https://dl.k8s.io/release/$(curl -L -s https://dl.k8s.io/release/stable.txt)/bin/linux/amd64/kubectl"
chmod +x kubectl
sudo mv kubectl /usr/local/bin/kubectl
5. Create Your First Cluster
Use the following command:
kind create cluster --name=mycluster
6. Verify Cluster and Nodes
To list clusters:
kind get clustersTo view nodes:
kubectl get nodes
7. Create a Custom Cluster Configuration
Create a file named config.yml with the following content:
kind: Cluster
apiVersion: kind.x-k8s.io/v1alpha4
nodes:
  - role: control-plane
    image: kindest/node:v1.31.2
  - role: worker
    image: kindest/node:v1.31.2
  - role: worker
    image: kindest/node:v1.31.2
Run the command to create the cluster:
kind create cluster --name=mycluster --config=config.yml

8. Manage Namespaces
Create a namespace:
kubectl create ns mynamespaceList namespaces:
kubectl get nsDelete a namespace:
kubectl delete ns mynamespace
9. Deploy a Pod
Run an Nginx container:
kubectl run nginx --image=nginx
Check the pod status:
kubectl get pods
Describe the pod for details:
kubectl describe pod/nginx
Key Takeaways
Kubernetes is the backbone of modern containerized applications, providing features like scalability and resilience.
Tools like KIND simplify Kubernetes setup for local environments, making it accessible for beginners.
Understanding the Kubernetes architecture and its components is crucial for mastering container orchestration.
For more details, explore the official Kubernetes documentation: Kubernetes Docs.
Start your Kubernetes journey today and leverage its power to manage containerized applications seamlessly! 🚀
Let me know your thoughts and experiences in the comments. 😊